
Introduction
Its important to read the following tips before you start your stocktake:
Stocktaking Tips
- A stocktake is most accurate when done closed.
- If your stocktaking whilst trading, you will need to check stock levels of items sold on the days, you have been stock counting.
- You can only stocktake one branch at a time.
- Make sure your scanner is clear before you start the stocktake.
- Multiple Branches – Make sure all transfers have been accepted and ask all stores not to transfer stock, whilst stocktakes are being carried out.
- Partial stocktakes – need to be done by brand. You can not partially scan the shop and compare this.
Stocktake Home Screen
Here is an overview of the stocktake home screen.
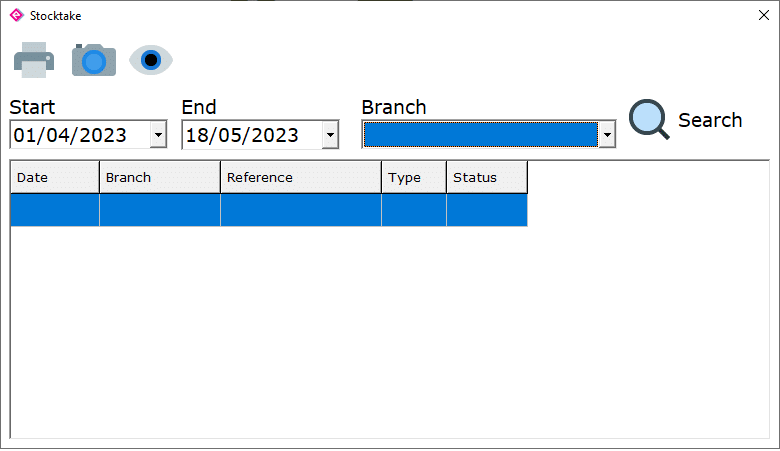
Button Functions:
 Print Stocktake Print Stocktake |  Create Snapshot Create Snapshot |  View Stocktake View Stocktake |
Starting Your Stocktake
Your first step on a stocktake is to take a snapshot of the system, before you start the stocktake. A snapshot saves your current stock levels in to a stocktake, for you to then later compare your count.
- Press Create Snapshot
- Select Branch
- Give a Reference Name
- Select Type
Your next step is to count the stock.
Most customers use stocktaking scanners to stocktake.
However you can export the product stock listing report and use this in excel to update the stock levels instead of using a scanner.
Types of stocktakes
Global:
A global stocktake, is scanning everything in the branch selected.
Partial:
A partial stocktake example is where you are only scanning one brand.
After you have selected partial you will be taken to the partial stocktaking screen. This is where you can add the partial stocktake items.
For warehouses, you can do this by bin number(s).
We would highly recommend keeping it to one brand at a time, as partial stocktakes are a lot more complex.
We would also advise to speak to a member of our support team to find out more on partial stocktakes.
View Stocktake
View stocktake, takes you to the view screen. This is where you upload your counts, compare results and update the stocktake.
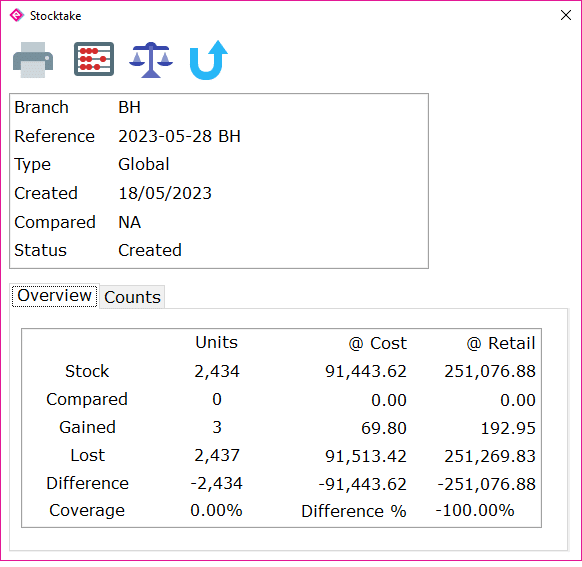
Button Functions:
| Print Stocktake |  Import Stock Count Import Stock Count |  Compare Counts Compare Counts |  Update Stock Update Stock |
Importing Stock Count
- Select File, Press Open.
- Map PLU/Barcode using the drop down box.
- Map Quantity using the drop down box.
- Press Import.
- Repeat again if you have multiple files.
The stock count is now imported, the system will remove any invalid barcodes.
To view the count information, press print.
Compare Results
- Press Compare.
- Click ok to confirmation message, if you are happy to continue.
- Your stocktake results will now be on the screen.
- You can view/print the discrepancy results, by pressing print.
Please Note: Comparing the results does not update the stocktake. You will need to press update, to update the system to what you have counted.
Stocktake Results
Please find below what the results show:
| Stock | The systems stock unit, cost and retail totals. |
| Compared | The counted stock unit, cost and retail totals. |
| Gained | The overall figure of items gained. For example, you have 0 in stock but have scanned 1. |
| Lost | The overall figure of items lost. For example, you have 1 in stock but haven’t scanned it. |
| Difference | Gained – Lost = Difference. |
| Coverage | A percentage based on number of items in stock in the system vs items scanned. |
| Difference % | Overall Difference % for example -3%, would be a 3% loss overall. |
Update Stocktake
This updates the stock to what you have counted and compared.
WARNING: This operation is permanent and can not be undone. Please make sure you are 100% happy to update.
You do not need to update your stocktake straight away, but its better sooner, rather than later.
If you have closed out of the stocktake, to open your stocktake:
- Open stock take.
- Press search.
- Select stocktake, press view.